| ||||||||||
| ||||||||||
| The Remote Control Window
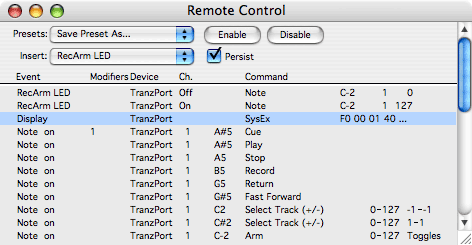
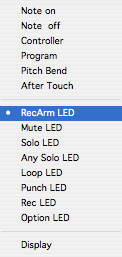
Click on the image to the left to find out more about what things in the remote control window do. For example, you could assign Note On for key C3 on Channel 1 to Play/Stop Metro. When you press C3, the current Section will play if Metro is stopped, or stop if Metro is playing. You can map your Pitch Bend Wheel to tempo; After Touch to Output Pan, and so on. Use the Remote Control window’s Insert pop-up menu to choose a MIDI event to assign to a Metro function. Afterinserting a MIDI event into the event list of the Remote Control window, click on the Command column and choose a Metro function to assign to the MIDI event. When choosing “Output Vol” or “Output Pan” from the Command pop-up, an additional pop-up menu appears to the right of the Command column; use this pop-up to select a destination Metro Output. When the command is controller the fields to the right of the command are the controller number, the input range and the output range. Click on any of the fields to change them.Prior to Metro 6.0.8, Remote Control channel assignments were not Port-savvy; there was a 16 MIDI channel limitation on all Remote Control events. Following the release of 6.0.8 it is now possible to specify the source port for Remote Control events. To respond to events from a single port only, select the desired port from the device popup located to the left of the channel popup in the Remote Control event. To select all ports, select all from the device popup. Only ports specified in the MIDI setup dialog are available in the Remote Control event popup. Recording Tempo (and other data) from Your Controller Hint: One very common and useful Remote Control feature is the ability to assign external MIDI faders (such as a JL Cooper FaderMaster) to control Metro Output faders. This allows for real-time mixing and recording of controllers. When using the mouse, you can only manipulate one controller at a time (unless you’re working with Grouped Outputs); when using external MIDI faders, you can control the volumes of multiple Metro Outputs at once. To do this, simply insert a Controller event in the Remote Control window; set the event’s channel and controller type; set the Command column to “Output Volume”; then map it to the correct Metro Output.Note: The Remote Control window can be used to set up a Step Time Record mechanism based on pressing different keys on your MIDI controller. For example, different Note On events can be assigned to the Step Record values of Rest, Whole Note, Half Note, Quarter Note, Eighth Note, etc. New to 6.3.5: In Metro version 6.3.5 vastly improved remote-control event support has been added including support for Remote Control output events. A preset fully supporting Frontier Design's Tranzport included. Use the insert popup to select the type of remote control event you would like to use. Events can either be input or output events. Input events are ones that will be recognized by Metro when they occur at a MIDI input device. This device must be selected in the record from popup of the MIDI setup dialog. The event types note on/off, Controller, Program, Pitch Bend and After Touch are input events. All the rest are output events. Output events will send MIDI data to a MIDI device depending on certain conditions. For example the RecArm LED will send a MIDI event whenever the current track's recording state changes to match the channel setting. To move events click to the left of the event and drag the mouse up or down. Rearranging events can be very important to ensure that processing of events occur in the correct order. The persist check box allows the current RC settings to persist across document loads and Metro restarts. Any embedded remote control information in a newly loaded document will be ignored if persist is checked. Modifiers allow for special device processing. For example, some external surface controller devices have a shift key that allows all of the buttons to take on new meaning when the shift key is down. The other modifiers, option 1 - option 7, work a bit differently. Options have a state of on or off and can be toggled with the command 'toggle option#'. A special output event 'Option LED' can be configured to display only if a particular option is on by clicking in the modifier field and selecting the correct option number. Input events can be configured to only respond when a particular set of options are on. Note: Option 1, if selected, is automatically used as a bank select of the track output volume and pan events. The option is multiplied by 8 to select the track to be affected. Study the use of the Tranzport preset to see a creative use of option 1 for loop playback. Since the Tranzport uses a 'Loop' button, the preset uses option 1 to denote whether or not looping is on. If looping is on when the play button is pressed, the preset issues a 'Cue' command to Metro. If option is off the preset will simply issue a 'Play' command. Option 1 is toggled on or off when the Tranzport's 'Loop' button is pressed. For input events this is the input device that is generating the MIDI event. This device must be selected as a 'record from' device in MIDI setup. Select 'All' to use any input device that generated this MIDI event. For output devices this any MIDI device that can produce output in your system. For input events, this is the MIDI channel that must match for processing of this event to occur. Select 'all' from the popup menu to match all MIDI channels for a particular MIDI device. For output events this is the state of the light emitting diode (LED). Some input events require more data to fully describe the event. In the case of note events this includes the pitch of the event. Input event commands select which of all the different processing will be performed when a MIDI event occurs from the correct device and channel. Output event commands determine which MIDI event will be sent when the corresponding item is changed in Metro. For example, if a 'Punch LED' is in the remote control event list, then when punch-in is enabled, Metro will send out a MIDI event corresponding to the punch LED's command. Output events can only be note, controller or display. Display is limited to sending a sys-ex message optimized for a 40 character display. This display includes the current track name and the current Bar/Beat/Clock position or when the jukebox window is frontmost, the display shows the current song playing. Some command actions that occur require parameters for the action to be complete. For example, if a note is generated for an output event, it must contain a pitch, a channel and a velocity. For a map controller event the parameters are a controller number and an input and output data range. The data ranges can be specified by double clicking on any of the range values. The other parameters are specified by clicking in the fields directly to the right of the command field. Presets:The presets menus is used to both load and save presets. Selecting any item other than 'Save Preset As..' will cause the current remote control setting to be overwriiten with the newly selected one. Once the remote control events are in the correct order and working properly it is a good idea to save them as a preset so that they can be easily recalled later. To do this, select 'Save Preset As..' and save the preset using the standard file dialog that appears. Presets must be stored in the default 'presets' folder inside of the Metro folder in order to be found. Enable/Disable Events:To enable or disable individual remote control events, select the events and click on the appropriate button. Disabled events are simply ignored. |
| ||||||||||

 The Remote Control window allows you to control a great deal of Metro’s functionality directly from your controller device. This is possible by assigning certain MIDI events to perform certain Metro functions.
 Two
Two